 It goes without saying that the best way to launch an internet business is to immediately provide the best quality hosting for the website, a recognizable domain and, naturally, start a web presence. However, all internet actions should be preceded by an idea, a plan and a sufficient amount of resources. Once you’ve summed it all up, you can start with the necessary preparations for the site launch, starting with advertising to connecting with potential clients, as well as maintaining the already established relationships with the steady clients.
Regardless of the motive behind your plan, i.e. launching a personal blog or website for your company, the very beginning does not have to be tied to big investments, grand plans, and long-term goals. You can move gradually from a certain budget, although continuously monitor it in order to track and understand the development of visits, demands and the results of your internet presence.
Three packages for a blog or site, select one
AdriaHost has provided adequate three service packages that can meet both capacities required for small personal websites and blogs through small companies and large enterprises with a large number of visits. All three packages can be found here: Hosting Packages
As you can see in the photo, what’s offered are the Basic, Business and Business Plus package; this article will only cover the Basic package that meets capacities required for anyone who is just starting.

Basic Package – Perfect For Small Sites And Blogs (17-25 € / year)
This basic, “starting” package gives you access to 2GB of disc space, 200GB for monthly bandwidth, and the ability to set up a site to 50,000 visits per month. This is plenty to start with if we are talking about starting from scratch and having no previously set up buzz that would attract the audiences; however, if you happen to experience a great popularity from the get go and exceed a specific limit on the number of visits or if you just want to expand the initially set capacity, you can do it with the help of our team which will attend to you in the shortest time possible.
The price for this package is 25 € per year, but if you decide to pay for three years in advance, you pay only two, so your hosting will cost you some 17 € per year. This is a great opportunity for anyone who is looking to have their site up and running for the next three, five and ten years. If you need a free SSL, pay attention to Business and Business Plus hosting packages. Additionally, along with the Busines plus package, you get a free domain.
Ordering And Purchasing Hosting And Domain
The first step to setting up the site is buying hosting and domains. Go to page: Hosting packages. As a part of the Basic package offer, click to choose the lease period and select one that suits you (the picture indicated by arrow sign).
If you choose three years, you get one for free and it’s the most cost-effective variant, that is if you plan to have a website for more than one year; at the end of page you’ll find explanations for ordering and you are given the option to compare price packages of one and three year period.

After selecting the desired period, click on Order located within the Basic package, below the billing period (do not click on the button located below the package that you have not planned). After clicking on the button Order you will be directed to a page for domain registration.
Domain Registration for blog or site of the company
This is where you register the address that will hold your site. You had, for sure, previously come up with one, figured out what format you want it in, explored and established ways of how people react to it and whether it’s memorable enough. Enter your desired address in the field. If you want your site to be featured in the mywebsite.com domain, enter mywebsite only. In the drop-down options select any of the domains suitable, i.e. .com, .info …
Please check again whether you have entered the target address correctly and click the Continue button.

The Order Confirmation And Detail Insight Into The Purchased Hosting And Domain
Immediately after clicking the Continue button, provided that the chosen domain is available, you will be redirected to a page with details of the order. All these details are on the same page so don’t get confused that, in this text, you see them separately.
Domain Options:
You’ll see options allowing purchasing of the same addresses in different domains such as .net, .org, .co.uk or .info (the picture 2). Many opt for purchasing of all the listed options in order not to have someone else buy the same address and thus accidentally or intentionally confuse consumers who are looking to find them. It is not a mandatory option, but it definitely is worth considering.
If you already have a hosting site, highlight the option marked 3 in the picture. And if you want to activate the protection of data holding information on the owner of the domain (identity will be hidden to the public), select the option marked 4 in the picture.

Hosting Package:
This section gives you the option to double-check your hosting package and pick another one in case you’ve changed your mind. By clicking on the drop-down menu you’ll once again get the option to choose another package. FYI, don’t forget to check the time frame/period before you switch to the next step.

Your Account Info:
Assuming you are a new user, we’ll lead you through the process of filling in all of the info needed. Enter your name in the field provided that you use to log on to customer support client zone. You are not supposed to enter your last name/surname in this section. Also, enter your current e-mail address in the Email field.

Payment Information:
Enter your personal information that will be necessary for your payments to be transferred and processed. Select your country, enter your correct name and surname, your current e-mail address, and your phone number. If you are setting up an account for a company, check the company box; this will open up more options for entering the company name and tax identification number. Enter the address, city and zip code.
Select your payment method. If you are a company, it’s very likely you’ll be paying through the account. For individuals, there is the option of paying via invoices or credit cards.

Enter The Promo code:
If you follow updates on our social networking profiles, you can see the promotion and publication of codes which give you the opportunity to get certain discounts. If you saw our release and you know how to read a promotional code, enter it in the field provided for it and click OK.

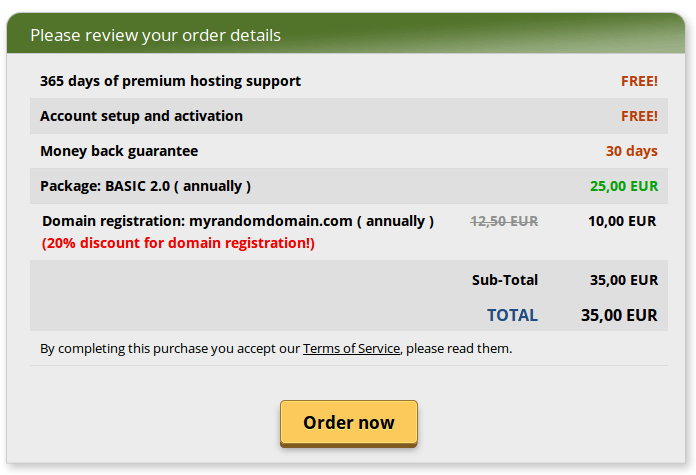
View Order Details If You Choose To Pay For Three Years In Advance:
In the end, you have an overview of the services that you pay for and what you are getting. The picture below shows the sum up that includes:
- the price of hosting for three years
- the price of domain registration for one year
This is for sure a more beneficial opportunity where you are basically getting the whole year of the service for free (2+1). This is what you are in for:

Just to make sure, double check whether everything is exactly as you’ve planned it. If everything is OK, click Order. This completes the ordering of hosting and domains.
View Order Details If You Choose To Pay For One Year In Advance:
In the picture below you can see the price of the same hosting package and the sum that includes:
- the price of hosting for one year
- the price of domain registration for one year

Depending on your financial capabilities and plans, select the option that suits you best in terms of payment. It is worth mentioning that the first option of prepaying for three years is the most profitable one.
Expect a new email to the address you entered in the required field. The email will contain all the information necessary to log on to the AdriaHost website client zone. After that, you will receive a follow-up email with the information for payment. If you’ve specified that you want to pay through an invoice, all it takes is to take the data that you’d previously provided and take it to your nearest post office or bank. Once your payment is through you will receive another email with all the data necessary for the management of your purchased space and the address of your site.
Installing WordPress Via Softaculous From cPanel
Upon completion of your hosting and domain order, you’ve received your first AdriaHost email. After you’ve completed the payment, your services will be available for use really soon.
The Email With All The Access Data, cPanel, Passwords, Addresses
You will receive another email with all the data necessary for managing your rental property and address. To install WordPress you must first access the cPanel – a tool for management and maintenance. Read the email with the data, find the password and access links.
The easiest way to access CPanel is by adding “/cpanel” to your site address. This is what it looks like:
http://myrandomtestdomain.com/cpanel
You will be given a form to enter the username and password (the data are in an email that you received after payment). After you enter them, you’ll open a cPanel that looks just like the picture below:

cPanel provides much more than the installation of WordPress, but this is something we will cover in another article. Our current focus is the best ways to install WordPress site quickly, easily and conveniently. Here’s how:
How to install WordPress with the help of a Softaculous
In cPanel, look for Softaculous. Click on Softaculous Apps Installer.
 On the left are all the available scripts that you can install via Softaculous-a. To install WordPress go to Blogs and click on WordPress.
In the right panel, click Install Now to start the installation.

Enter basic information concerning the installation of WordPress. In Chose domain, select the domain where you want to install WordPress (if you have multiple domains).
Pay special attention to In Directory option, if you type a name in it, Wordpress will be installed in a folder like this your-sajt.com/folder-name. If you do not want to install WordPress in a root of domain, leave this field blank (delete wp entry).

In this area, enter the name of the site and site description. These details can be changed later, so it’s not necessary to over-stress on them.
If you want to install WordPress WPMU you can mark this option.

Choose Language – You can select the language that will automatically be placed on the WordPress installation.

In this section set the username for the site administrator, password, and email. All three data make a note somewhere on the side because otherwise, you will not be able to access the editing site.

After entering all the data you can click on the Install button to install WordPress. If you want to provide information about the installation yourself or someone else in the email, you can enter the email address in the field provided before clicking Install.

The installation does not last long and soon you will see a screen like an image below. On this page, you can access the link to the admin part of WordPress. Through this link, you access the WordPress Dashboard using data entered during the installation.

Conclusion
You’ve seen how to buy hosting, register a domain, install WordPress and you’ve probably also realized that the whole thing doesn’t really cost much at the very start of it. Even this manual was prepared for beginners who hope for their words to start circling the Internet but are convinced such an action is reserved for experts and developers only. All of the enthusiasts out there will be happy to know that their dream doesn’t cost a lot and that all it takes is to have a great idea and a trustworthy partner who will be able to go with the web requirements.
If you’re still unsure about some of the steps, don’t hesitate to ask, comment below or contact technical support. We are also open for advice, suggestions or some fresh, new ideas.


0 Comments